
Updates provide both new features and bug fixes for the system’s software. You anticipate that each Windows update will include bug fixes and new features or system modifications, but this is only sometimes the case. For example, numerous users have claimed that their PC’s audio stopped working after updating Windows. After the Windows update was installed, most users had no audio output and received the ‘No audio output device is installed’ error message. Typically, this is caused by outdated drivers on your system. You may likely face this issue when a Windows update corrupts your system’s audio driver. There is no need for an alarm if you have encountered this error. This post describes fixing the error No Audio Output Device Is Installed on Windows 11.
How To Quickly Fix No Audio Output Device Is Installed In Windows?
If you cannot hear the volume on your Windows PC and receive the No Audio Output Device is Installed error, follow these steps. Then this article will be of assistance. Ensure you have tried boosting the volume and changing a different speaker or earphone before proceeding with the troubleshooting steps. If it does not assist, proceed to the next section of this article.
Update Audio Driver
We recommend that you update the Audio Driver as your first thing. To accomplish this, follow the steps listed below.
1 – From the Start menu, search and select Device Manager.
2 – Double-click the Sound, video, and game controllers section to expand it.
3 – Now, right-click the Audio driver and click Update Driver.


4 – Click Search Automatically for Drivers to automatically download and install an audio driver from the internet.
5 – After the update has been installed, restart the PC.
You may also update your Audio Driver by visiting the website of your sound card manufacturer.
Reinstall Audio Driver
If updating the drivers doesn’t resolve the issue, we suggest reinstalling the audio driver. The steps necessary to do this are listed below.
1 – Click Device Manager after pressing the Windows + X key combination.
2 – Expand the Sound, Video, and game controller options by double-clicking them.
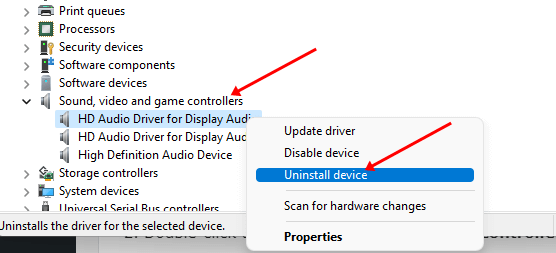
3 – From the list of drivers, right-click your audio driver and click Uninstall Device.
4 – In the window for confirmation, click the Uninstall button.

5 – Once complete, restart the device to reinstall the drivers.
Run Audio Troubleshooter
Audio Troubleshooter will assist in resolving any issues with audio output and input. To run an audio troubleshooter, please follow the steps outlined below.
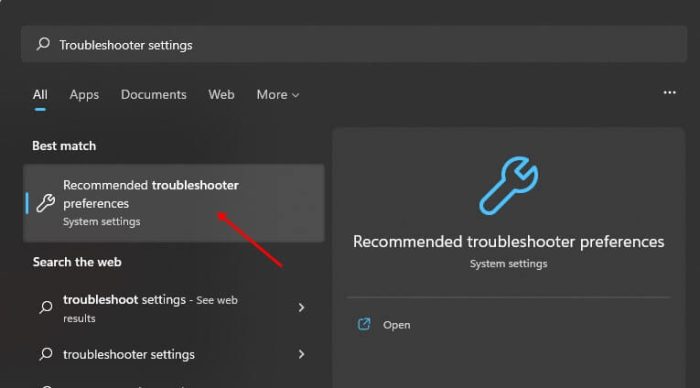
1 – Press the Windows key and search for the Troubleshoot Settings option.

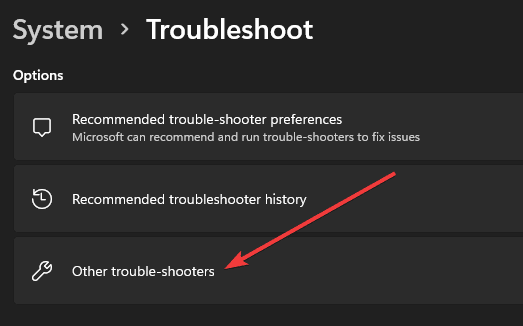
2 – Click Other Troubleshooters here.

3 – Locate Playing Audio and click the Run button beside it.
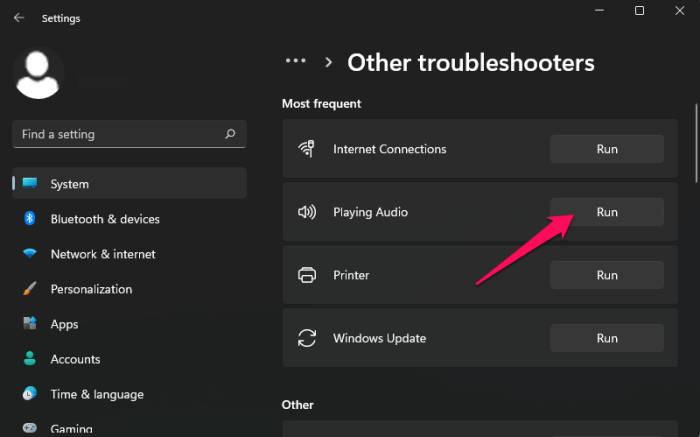

4 – Follow the directions on-screen to run the audio troubleshooter.
Change Mono Audio Settings
Changing the Mono Audio Settings is the next thing you can take. Listed below are the necessary steps.
1 – Press the Windows + I key to open the Settings app.
2 – In the sidebar on the left, choose Accessibility.
3 – Now, under the Hearing area, click Audio.


4 – Here, check whether Mono Audio is enabled or disabled. If it’s enabled, disable it; if it is disabled, enable it.
Uninstall Last Windows Update
As a Windows update triggered the issue, you can attempt to resolve it by updating the most recent update. The steps necessary to do this are listed below.
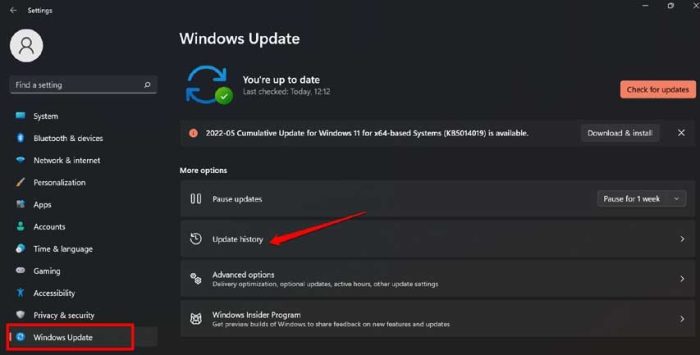
1 – Navigate to the Start menu, search for the Settings app, and open it.
2 – Then, choose Windows Update from the sidebar on the left and click the Update History option.

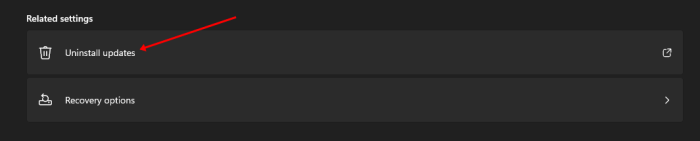
3 – Click the Uninstall Updates option beneath the Uninstall Updates section.

4 – Locate the most recent update installed and click the Uninstall icon next to it.
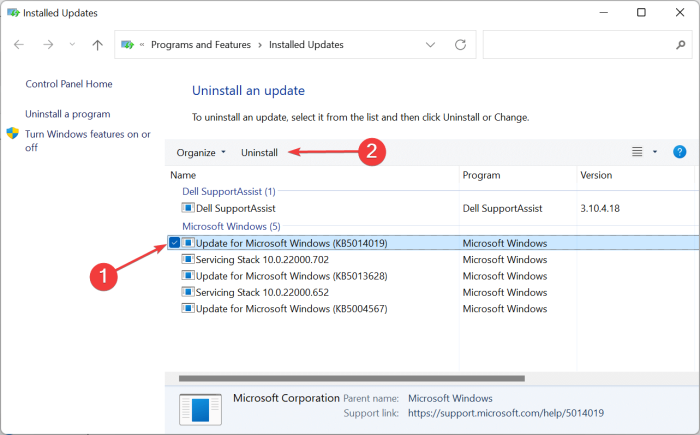

5 – At the prompt for confirmation, select the Uninstall option to remove the update.
Perform System Restore
If none of the above steps helped fix the issue, we recommend doing a system restore.
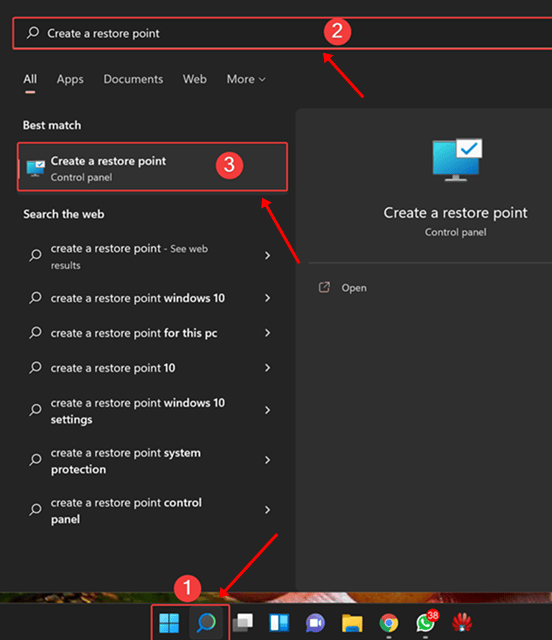
1 – Navigate the Start Menu, search for Create a Restore Point and open it.

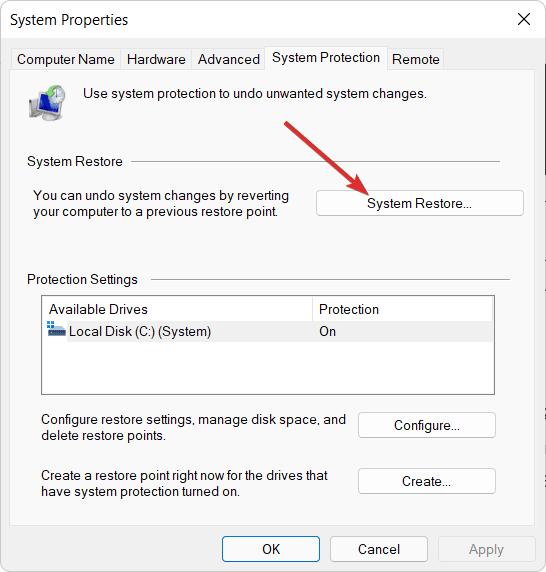
2 – Click the System Restore button.

3 – You will now see the Recommended Restore and Choose a different restore point options.
4 – If the Recommended restore option indicates that you should uninstall recently installed updates, select that option; otherwise, choose a different restore point if you wish to select a restore point manually. Once complete, click Next.
5 – Choose the restore point. If you wish to determine which programs will be reinstalled or removed following the system restore, click Scan for impacted programs; otherwise, click Next.
6 – Click the Finish button to start the system restore.
7 – A system restart will occur throughout the process. Wait until the process has been completed.
8 – Upon completion, check if the issue is still present.
The Bottom Line:
Typically, the No audio device is installed error in Windows 10 is caused by driver issues after installing Windows Update. However, if you’ve been experiencing this issue, you can fix it by following the steps outlined in this article.