
Fix Unfortunately Settings Has Stopped Error: If we look around, we will see that the Android operating system is gaining popularity. This is because most of us are fully dependent on our Android devices. Using our Android smartphone, we accomplish various tasks, including making phone calls, sending text messages, browsing the web, and playing games. Unfortunately, because Android is built on Linux and is open source by design, we may anticipate a few bugs on the platform.
The operating system still has some bugs despite the developers’ best efforts. For example, if you use Android, you may have seen the following error: “Unfortunately Settings Has Stopped.” This is one of the most annoying bugs the Android operating system is plagued with. This article will cover every aspect of the Android error message “Unfortunately Settings Has Stopped.”
What Is Unfortunately Settings Has Stopped Error?
As we’ve already discussed, Unfortunately Settings Has Stopped one of the most prevalent and unpleasant errors that afflict the Android operating system. The error is exclusive to Android smartphones and may occur at any time while entering the Settings panel. Using apps frequently results in the occurrence of the, Unfortunately Settings Has Stopped error. Occasionally, the error is caused by installing a new firmware update.
This is a relatively typical problem, but when the KitKat update was introduced, it caused chaos. Unfortunately, a software update does not always cause the error; corrupted apps might sometimes be the error of the issue. However, as it is a relatively frequent problem, a simple restart may fix it. However, if the error notice appears frequently, there are a few further things you must take.
How To Quickly Fix Unfortunately Settings Has Stopped Error?
In most instances, rebooting the Android device can fix the “Unfortunately Settings Has Stopped” error. However, if you frequently receive the error code after a restart, the following solutions will help you resolve the issue.
Restart Device


As previously discussed, a simple restart may typically fix the “Unfortunately Settings Has Stopped” error on your Android smartphone. So, restart the device.
1 – Press and hold the power button on your device.
2 – It will then display a pop-up where you must tap Restart/Reboot.
3 – Now, wait for your phone to restart.
After the restart, you may use the smartphone normally; the error will no longer occur. However, follow the below methods if the error persists after a restart.
Clear Phone’s RAM
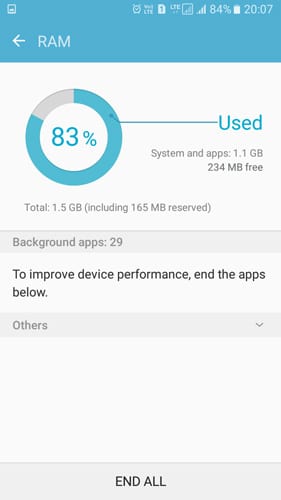
Occasionally, a shortage of RAM is also observed to cause the Unfortunately Settings has stopped errors on Android. However, clearing a phone’s RAM is simple and does not require a third-party app. Typically, smartphones now ship with a RAM management app that can clear RAM with a single tap.
1 – Identify the device’s internal RAM Manager. The RAM manager is located in Samsung’s ‘Smart Manager.’
2 – The RAM Manager displays your device’s current RAM.
3 – Now, tap the ‘Clear RAM’ button to release some RAM.
That is all! Now use the smartphone normally to see whether the Unfortunately Settings has stopped issue has been fixed. If the method persists, follow the subsequent problem.
Clear Cache Of Settings
Corrupted cache files cause every error that happens on your Android smartphone. Similarly, if your Settings app has stored a corrupted cache, it may be the reason for the error. To easily clear the store for the Settings app on Android, you must follow the instructions below.
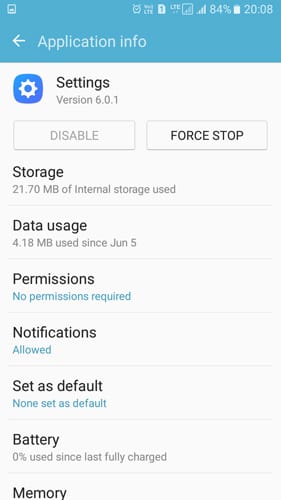
1 – Navigate to Settings > Applications or Application management.
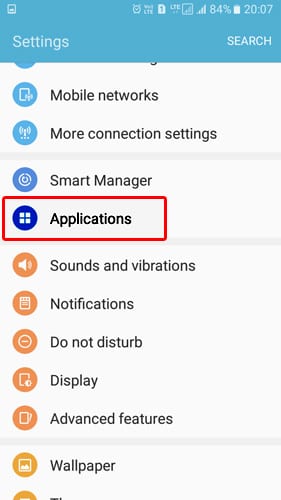
2 – The list of apps installed on your device will appear.
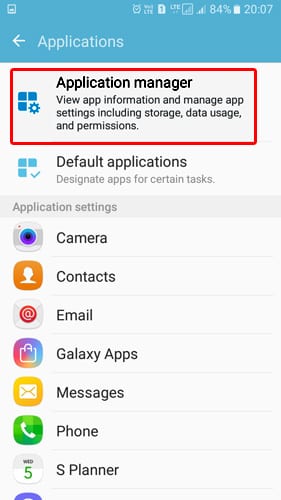
3 – Locate the Settings app and tap it.
4 – Now, tap the ‘Force Stop’ button. Then, tap “Clear Cache” and restart your Android device.
Use your Android smartphone normally after the restart to see if the error continues. If the previous method fails to fix the error, follow it to the next.
Clear Device’s Cache
In the last method, we cleared the Android Settings app’s cache. Nevertheless, with this method, we must clear the cache of all loaded apps on your device. After clearing the cache, the phone may exhibit erratic behavior, but it will normalize after a few minutes of use.
1 – Navigate to the Settings menu on your Android.
2 – Locate the ‘Storage’ option in the Settings panel.

3 – You must find and tap on the ‘Cached Data’ option under Storage.
4 – You will now see a pop-up titled “Clear Cache Data.” Tap “Delete” to clear the cache file.

That is all! This will clear your Android smartphone’s cached data. Now restart the Android device and use it as normal. You will no longer see the Unfortunately Settings Has Stopped error.
Uninstall Recently Installed App
As we’ve already discussed in the article, an Android or app update might generate the Unfortunately Settings Has Stopped error. Therefore, if you believe you are receiving the error after installing a third-party app, you must uninstall that app. However, if you believe the installed apps are functioning normally, you can attempt to boot into safe mode. Safe mode disables all installed third-party apps on your Android smartphone. Therefore, if an app causes the error, you will not see the Unfortunately Settings Has Stopped message in Safe mode. If the error occurs in Safe Mode, the apps have no problem. Therefore, skip this method and follow it to the next.
Factory Reset
The methods mentioned above will likely fix the Unfortunately Settings Has Stopped error on your Android smartphone. However, if none of those solutions have worked, the final option is to do a factory reset on your Android device. However, wiping data will delete any apps and files installed on the Android device. Therefore, create a backup of your data before performing a Factory Reset. Resetting your Android smartphone is straightforward; follow the procedures outlined below. So, here’s how to restore your Android smartphone to factory settings.
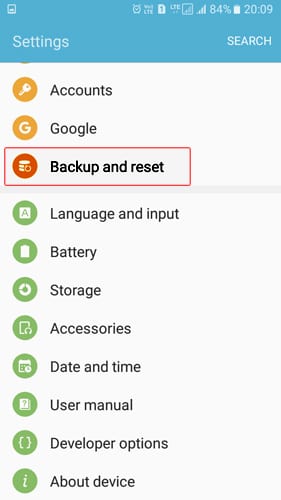
1 – Launch Settings on your Android smartphone.
2 – Now, under Settings, you must find and tap “Backup & Reset.”
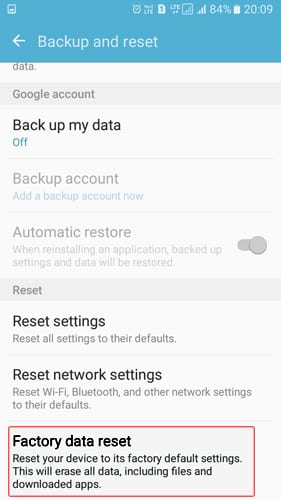
3 – In the following step, you must tap ‘Factory Data Reset.’
4 – Tap the ‘Reset Phone’ button.
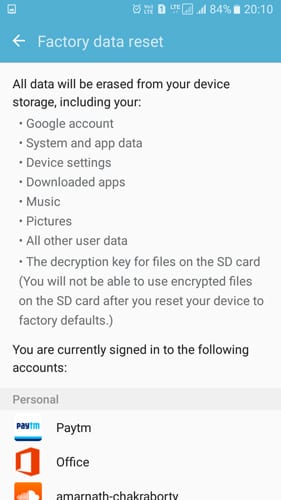
This will delete all files saved on the internal storage of your Android device. Therefore, you should create a backup before performing a Factory reset. After the reset, your device will work normally, and you will no longer see the Unfortunately Settings Has Stopped error.
Wipe Cache Partition
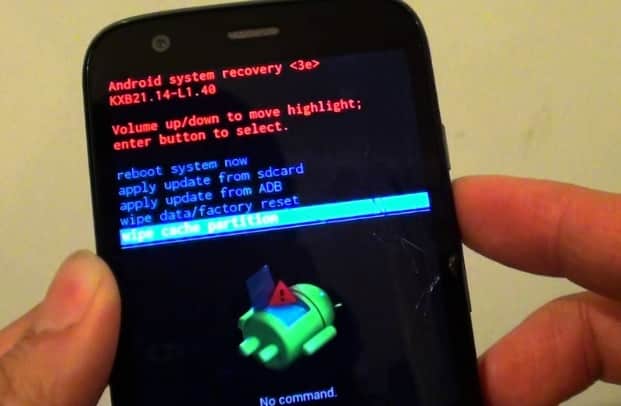

To wipe the Cache Partition using this method, we must enter Recovery Mode. These things will clear the whole system cache and the app’s cache. To enter Recovery Mode, however, you must know the key combination. To enter Recovery Mode, search the internet for your device’s recovery mode option. Therefore, to delete the cache disc, you must shut down your mobile device and enter Recovery Mode. Scroll to the Wipe Cache Partition option in the Recovery Menu using the volume button. Using the power button, select the wipe Cache Partition option.
Uninstall And Reinstall Google Play Store Updates

We fix that Google Play Store may have nothing to do with the Unfortunately Settings Has Stopped the error, but these methods are occasionally effective in resolving the error. You only need to clear the Google Play cache and uninstall the Play Store update. To do so, go to Settings > Applications. Find the Google Play Store under the Apps section and tap it. Uninstall the previous updates and clear the cache. Restart the device, and the Unfortunately Settings has stopped error will no longer be there.
Conclusion:
Therefore, in this post, we will examine every possible solution for resolving the Unfortunately Settings Has Stopped error on the Android smartphone. We have provided a list of six methods guaranteed to work if applied properly.