
Upon first look, the FlashForge Adventurer 4 may appear unexciting to avid 3D printing enthusiasts. It prints smoothly and efficiently, with minimal issues or complications. My second print with the Adventurer 4 was a large bird feeder that took almost 29 hours to complete. I would have been nervous about attempting such a long and complex print in the past, as they were often prone to failure. The Adventurer 4 effortlessly handled the print, delivering a flawless and hassle-free result right out of the box.
This easy performance demonstrates the significant progress of 3D printing. In my review of the FlashForge Adventurer 4, I discovered that this device is an attractive choice for consumers seeking one of the top 3D printers that surpass beginner-level printers. However, using the FlashForge Adventurer 4 printer has its challenges. The software for preparing prints and operating the printer has some areas that could use improvement.
FlashForge Adventurer 4 review: Price and availability
Get your hands on the FlashForge Adventure 4 today for just $799.99. The price covers four print heads and a 1kg reel of filament. Package options are also available, including a 2kg reel for $829 or a 4kg reel for $859.
The Adventure 4 is priced higher than certain entry-level printers we have tested, such as the Monoprice Voxel, which is priced at $399. However, it is a more advanced device that is relatively more affordable than some high-end 3D printers with expensive price tags.
FlashForge Adventurer 4 review: Design
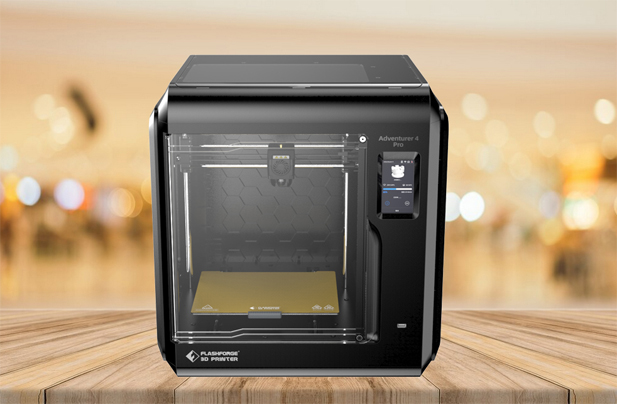
The Adventurer 4 is a spacious 3D printer with 21.7 x 19.7 x 18.5 inches dimensions. The printing mechanism is fully enclosed, featuring a compact fan at the back that efficiently removes air through a HEPA filter. Printing with this method is much less odorous than many other 3D printers. The filter captures small particles emitted by open 3D printers, which is a cause for concern.
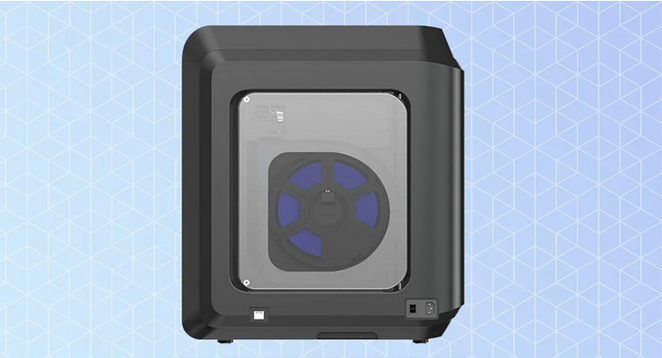
The top and sides have transparent panels, while the front is mainly covered by a clear plastic door that can be opened to access the print bed. A smaller door on the right side covers the filament reel. The filament reel is somewhat shielded from external air, crucial for moisture-absorbent materials like PLA.
The print bed of the Adventurer 4 is designed to be flexible and removable, allowing you to easily lift it off and bend it to remove your prints. It’s much simpler than struggling with a stationary print bed. With FlashForge, you’ll have the convenience of a second print bed. It means you can quickly start another print after removing the first one. It’s a major advantage for a busy 3D printer requiring continuous output. Furthermore, after completing a print job, the printer control screen immediately displays a dialog box inquiring whether you wish to print the same item again.
The Adventurer 4 is controlled using a user-friendly touch screen on the left side of the front. It was a breeze, except for the minor inconvenience of entering a password during the Wi-Fi setup process. The small on-screen keyboard frequently registered double inputs or misinterpreted the intended letter. Otherwise, that panel is suitable for initiating and overseeing a print.
Wi-Fi Connectivity

I had some problems with the Wi-Fi connection as well. Unfortunately, this printer wouldn’t connect to my Wi-Fi network, and I have no idea why. After trying multiple times and ensuring I entered the passphrase correctly, I decided to give up and switch to the wired ethernet connection instead. Surprisingly, it worked perfectly without any problems.
FlashForge Adventurer 4 review: Swappable print nozzles
The FlashForge Adventurer 4 has a unique feature that allows you to easily replace the print nozzle, which is responsible for melting the filament. The printer is equipped with four nozzles of varying diameters for the filament outlet. You have the choice between 0.3mm and 0.6mm options, as well as two 0.4mm nozzles. One of the nozzles operates at 240 ℃, while the other works at 265℃ for materials that require higher temperatures.
The concept is that a larger hole diameter on the nozzle allows for a greater amount of filament to be extruded simultaneously. This enables the use of thicker layers of material, which results in faster print times. Various temperatures allow the use of multiple materials. Certain filaments require higher temperatures for melting, enabling you to utilize materials such as Nylon with a higher temperature nozzle.
Swappable nozzles
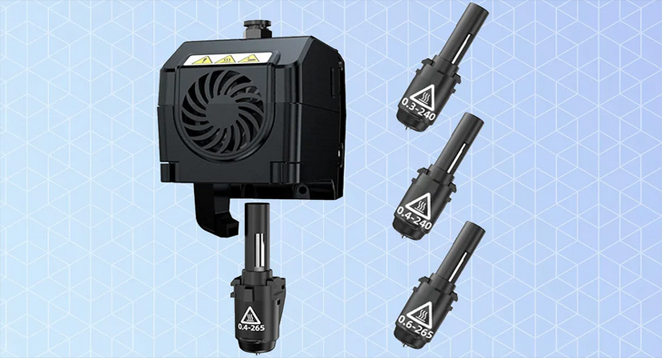
The Adventurer 4 offers swappable nozzles, which enhances its flexibility compared to other 3D printers. However, the process of changing nozzles can be quite delicate and requires manual effort. First, power off the printer. Then, carefully detach the clips securing the nozzle in place. Gently remove the entire nozzle assembly. Finally, cut the filament to free the nozzle assembly. Next, insert the filament into the new nozzle and carefully secure everything back into position until the clips lock it in place. Next, power on the printer and utilize the manual controls to advance the filament until it emerges from the nozzle. Lastly, you’ll need to use the controls to input a temperature offset. This value, provided by FlashForge on the nozzle packaging, represents the variance between the temperature detected by the nozzle’s sensor and the actual temperature it achieves.
It can be quite troublesome to accidentally use the incorrect nozzle without even realizing it. The printer doesn’t have the ability to detect the type of nozzle being used, so it may attempt to print with a different nozzle than the one intended.
In contrast, the Ultimaker S5 has a highly efficient automated nozzle change process. It can detect the print nozzle that is currently installed and seamlessly handle the task of removing and replacing the filament. Ultimaker’s approach is much more convenient for users who frequently switch between print nozzles for different prints.
FlashForge Adventurer 4 review: Setup
The Adventurer 4 is incredibly straightforward to set up. All you need to do is unpack the 3D printer, remove the orange tape securing the doors, and remove the foam pieces that keep the print head in place during shipping. After completing the initial setup, simply load the provided 1KG filament into the printer (our test unit was equipped with red filament) and start the calibration process.
It is where the setup process becomes slightly less convenient. On the Adventurer 4, you’ll find that the self-leveling feature is not as automated as in many other 3D printers. Instead, you’ll need to manually detect the print bed using a sensor on the print head, requiring more effort. When you choose the automatic bed leveling option, the printer will move the print head to nine different spots on the print bed. You can easily adjust the print head using the touch-screen control. Simply move it up and down by small increments until you can slide the included mylar between the print head and the bed. It will ensure that there is the necessary small gap between the two.
After completing this process for nine points on the print bed, the printer automatically compensates for any irregularities or deformations during the printing process. This printer’s combination of manual and automatic features feels out of place in its sophisticated and automated design.
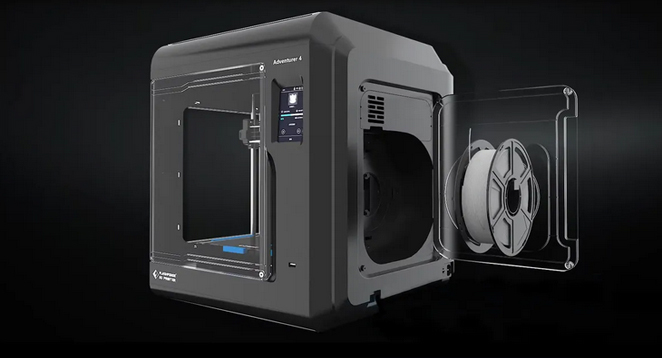
It’s a breeze to load the filament. Attach the filament spool to the hook on the printer’s right side and insert the filament’s end into the feeder. By pressing a button, the feeder effortlessly grabs the filament and smoothly guides it through the tube into the print head. After observing the melted filament emerging from the Adventurer 4’s print head, simply press the stop button and you’re all set to start printing.
FlashForge Adventurer 4 review: Controls
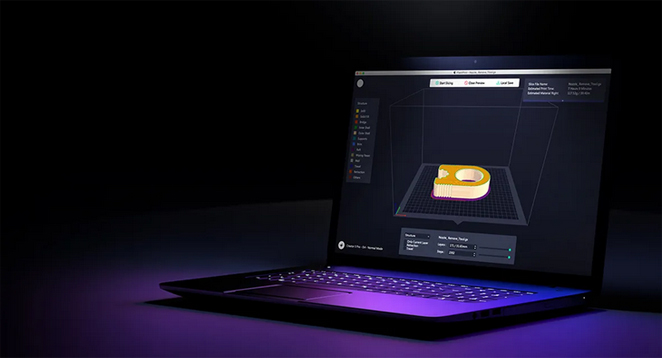
The Adventurer 4 can be operated using the on-device controls or a network-connected app. To utilize the built-in camera of the 3D printer, you will need to use the FlashPrint software, which is compatible with both Mac and Windows operating systems. Another option is to use software such as Cura to create prints, which can be saved to USB drives for printing.
FlashPrint is a good option for loading and preparing 3D prints. It has a variety of formats and a decent range of features. After loading, models can be easily adjusted, resized, copied, and manipulated for printing. Additionally, they can be sliced, which is convenient if you need to print a large model in separate sections. The program can also arrange a group of models for optimal printing and offers comprehensive control over the creation of supports to secure the model.
After preparing the model, simply click on the slice button. This action will divide the model into layers that the FlashForge Adventurer 4 will build sequentially. It also generates the file instructing the printer on movement and filament extrusion. Once the process is complete, you can preview the print layer by layer. This feature comes in handy for identifying any potential issues with your print.
Capture time-lapses
At last, you can send the file to the printer and begin the print process. You can save it to a USB drive or send it over the local network. You can watch the print in progress on the Adventurer 4 through its built-in camera, although the resolution is only 640 x 480 pixels. This camera can also capture time-lapses that are saved on the printer. However, the videos may appear grainy due to the low resolution and do not provide a clear view of the print progress.
The Adventurer 4 only has a single LED on the print head for lighting, so the camera doesn’t capture much unless there are additional lights. I placed a compact LED aquarium light on the printer’s top to enhance the lighting.
FlashPrint software
You can use the FlashPrint software to connect to multiple 3D printers and send a print file to all of them simultaneously. This feature is handy if you’re focused on printing and must make multiple prints simultaneously. However, it cannot accommodate multiple users or clients, making it less suitable for a school or other multi-user setting. If you require additional printer control or wish to grant access to multiple users, the Adventurer 4 is compatible with two cloud printing services: Polar 3D and FlashCloud, Flashforge’s cloud printing service. Although our testing was not extensive, these options are more suitable for classroom or office use.
FlashForge Adventurer 4 review: Print materials
The Adventurer 4 can handle various materials, from standard PLA and ABS to unique options like medical-grade Nylon, PETG, or transparent materials such as T-Glase. It is made possible by its swappable print nozzles and heated print bed. The printer’s nozzles can reach temperatures up to 265℃, while the heated print bed can reach 110℃. It allows the Adventurer 4 to support a wider range of printer materials.
The Adventurer 4 does not have a filament sensor like some printers, so it can use filament from any manufacturer without needing a specific material tag. You have the flexibility to use filaments with a diameter of 1.75mm.
FlashForge Adventurer 4 review: Print speed
The Adventurer 4 provides a print speed on par with other 3D printers we have tested. The printing time of our Thinker test model varies based on the size of the print nozzle used, ranging from 3 hours to slightly over 10 hours.
When selecting a print nozzle for the FlashForge Adventurer 4, you’ll need to find a balance between quality and speed. The size of the nozzle determines how fast the print will be, as a larger nozzle can extrude more filament at once.
The speed of a printer is determined by timing how long it takes to produce a 4-inch high print of our Thinker model. With the Adventurer 4’s largest 0.6mm nozzle, this process took 3 hours and 25 minutes. The print with the 0.3mm nozzle took a significantly longer time of 10 hours and 37 minutes, almost three times the duration. The difference in the number of layers printed accounts for the variation: the 0.6mm version had 444 layers, while the 0.3mm version had 850 layers.
FlashForge Adventurer 4 review: Print quality
The FlashForge Adventure 4 consistently delivered high-quality prints, successfully handling our intricate test models without encountering significant problems.
We did notice one issue – sometimes, when printing with PLA, the printer would create thin strands of material that made the prints resemble spider webs.
This issue occurs due to inadequate retraction, which refers to the printer’s failure to properly pull the filament back into the print nozzle while moving it between different parts. When the retraction is insufficient, a small amount of filament remains at the end of the nozzle, forming a thin string that adheres to the print.
These filament strands are not a major issue, just a minor annoyance. They can be easily eliminated using a sharp knife.
FlashForge Adventurer 4 review: Verdict
The FlashForge Adventurer 4 comes pretty close to being the perfect 3D printer. Just give it a 3D model, let it do its thing, and it will deliver a solid 3D print. Regrettably, the Adventurer 4 falls short of perfection. I encountered some problems with the software, like difficulty connecting to my Wi-Fi network and with the hardware, such as manually calibrating and swapping print nozzles.
Despite these concerns, the FlashForge Adventurer 4 is an excellent choice for avid 3D printer users who value seamless and uninterrupted printing. Plus, the price is under $1,000, making it a great deal.