

Snapchat is a terrific app for having fun with friends; however, it has flaws and glitches that restrict its use. It is typical for Android and iOS Snapchat apps to encounter errors when shooting snaps or playing games. For example, a few Android users have recently reported receiving the Snapchat Could not connect error when attempting to log in. The precise cause of this error is unclear, but there’s no need to panic because it’s easy to fix. The error message is also displayed when a new Snapchat account is created.
How To Quickly Fix Could Not Connect Error On Snapchat?
Internet connectivity difficulties or server outages typically cause the Snapchat error message Could Not Connect. However, you may quickly fix the error message on your Android smartphone by implementing these simple steps. Here is how to resolve the Snapchat Could Not Connect error.
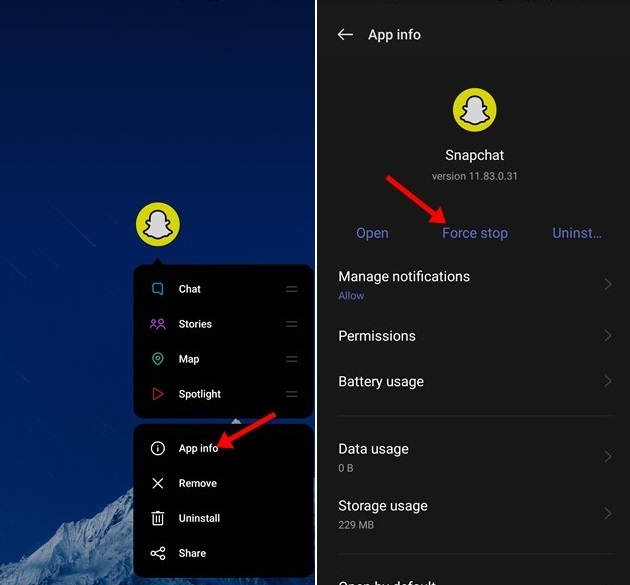
Force Close & Reopen Snapchat
If the app is having a brief problem, you must force close it and reopen it. Not only ‘Could Not Connect’ but also force stop and force close can resolve practically all temporary Snapchat issues. To force-stop Snapchat, touch and hold the Snapchat symbol on the home screen and tap the App Info button. This opens the app’s information page. Next, tap the Force Stop button located on the App details page. This will force halt the app and end any associated background processes. Finally, reopen the Snapchat app; the ‘Could Not Connect’ error message will no longer appear.
Check If Snapchat Is Down
As previously stated, the Could Not Connect error message is commonly linked to the internet. Therefore, this error message will appear if your internet connection fails. Likewise, if Snapchat’s servers are down, the app will be unable to interact and will display the Could Not Connect error message. Therefore, before attempting the subsequent procedures, check that Snapchat’s servers are operational. To check whether Snapchat is experiencing an outage, you must visit Downdetector or a similar website. If Snapchat is temporarily unavailable globally, you must wait until the service is restored. Meanwhile, you can use other instant messaging apps to connect with friends and family.
Update Snapchat App
If there is no Snapchat outage and you continue to receive the ‘Could Not Connect’ error message while attempting to log into the app, you must update Snapchat from the Google Play Store. Outdated apps frequently generate error messages and lead to app crashes or slowness problems. In addition, an older version of the Snapchat app might cause an error message. Update the Snapchat app from the Google Play Store.
Uninstall Snapchat Mods & Other Unauthorized Apps
Numerous Snapchat mods for Android give more features and options. And by using these apps, you are bringing trouble upon yourself. If your Snapchat account is linked to modded or unapproved apps, you will see the ‘Could Not Connect’ error message. In addition, Snapchat Mods can lead to account suspension. Therefore, if you use unapproved apps or plugins, log them in and retry logging in.
Turn Off VPN/Proxy Settings
If you use a VPN app or custom proxy settings on your Android smartphone, Snapchat will not function properly. Even if you can log in with your Snapchat account, using the app’s functionality will result in connectivity troubles. VPN or Proxies alter your IP Address, compelling Snapchat to connect to a server in a different region. And when the app cannot connect to the server, it displays error errors such as Could Not Connect. Hence, turning off VPN or Proxy settings before logging in to a Snapchat account is suggested.
Clear Snapchat App Cache
A cache file that is out of date or corrupt causes connection problems. If you continue to see the Could Not Connect error message, the app’s cache file has likely become damaged. You must delete the Snapchat app’s cache file to resolve cache-related problems.
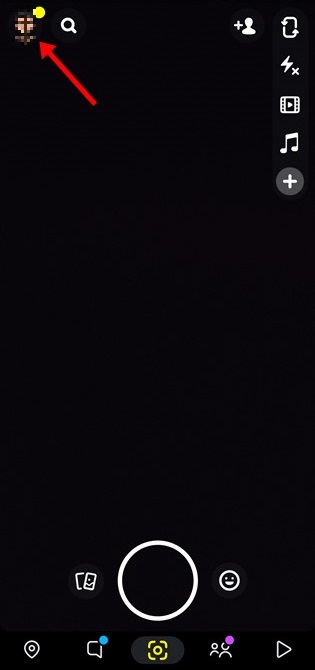
1 – Launch the Snapchat app on your Android device. Tap your profile photo in the upper-left corner next.
2 – Tap the Settings gear icon in the upper-right corner of the Profile Settings screen.

3 – Next, on the Settings screen, scroll to the bottom and tap the Clear Cache button.

4 – Tap the Continue button on the Confirmation prompt.
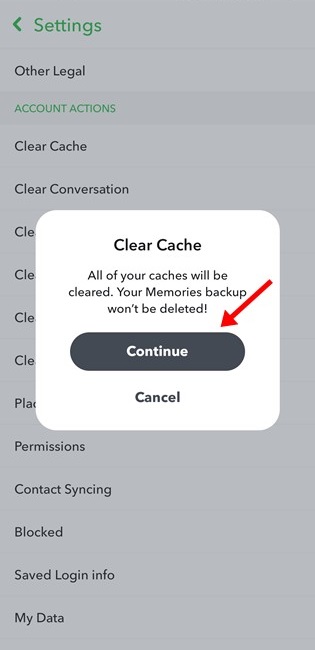
That is all! This is how you may clear Snapchat’s Cache file to resolve Android’s Could Not Connect error message.
Conclusion:
Therefore, these are some of the most effective solutions for Snapchat’s Could Not Connect Error message. Of course, you must contact Snapchat’s customer service staff for assistance if the problem persists. If you know of any further Snapchat error resolution methods, please let us know in the comments.